There are various ways to enhance the privacy and security of your Firefox browser, ranging from tracker blocking to advanced security features. However, it's important to note that certain features offer different levels of privacy and security, and some are not enabled by default. In this article, we will explore different methods to optimize your Firefox browser for enhanced privacy and security.
How to improve your Firefox privacy and security
1. Enable Enhanced Tracking Protection in Firefox browser
- Open the Firefox browser on your computer.
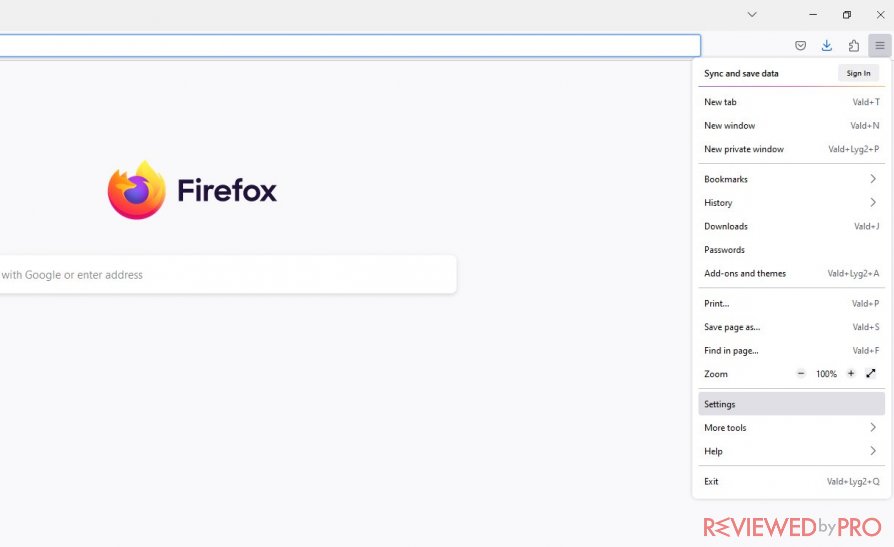
- Click on the menu button (three horizontal lines) in the top-right corner of the Firefox window.

- From the drop-down menu, select “Preferences” (on macOS) or “Options” (on Windows).
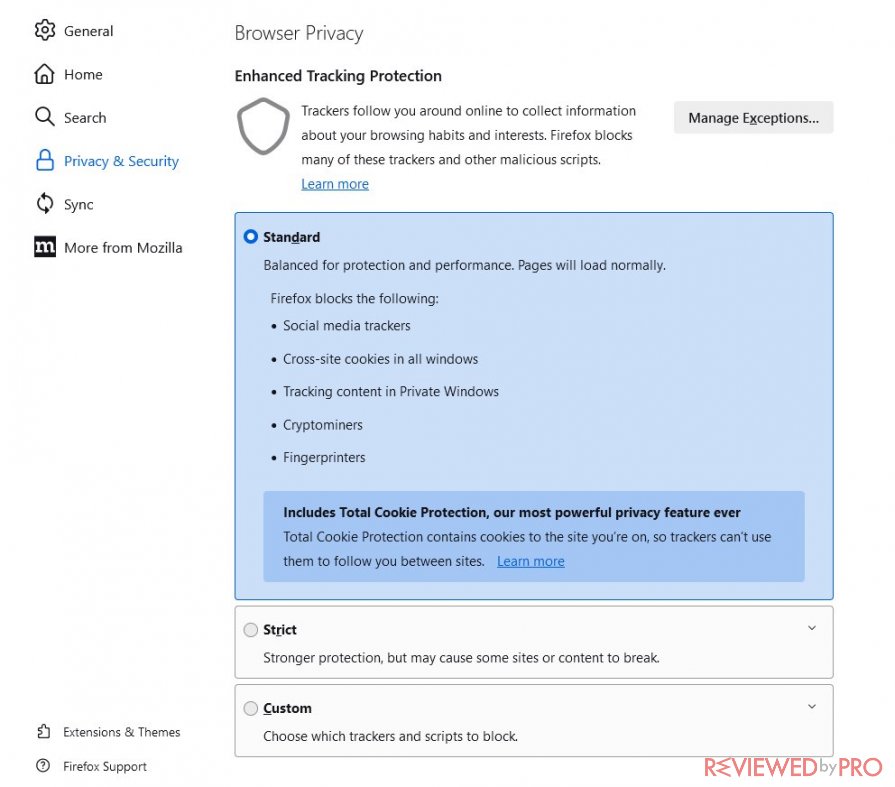
- In the left sidebar of the preferences/options page, click on “Privacy & Security.”
- Scroll down to the “Enhanced Tracking Protection” section.
- You will see three options: “Standard,” “Strict,” and “Custom.”

– Standard: This option blocks known trackers while allowing some trackers from websites you haven't visited.
– Strict:This option blocks known trackers from all websites, providing maximum privacy protection.
– Custom: This option allows you to customize which types of trackers to block. - Choose the level of protection that suits your preferences by clicking on either “Standard” or “Strict.” If you prefer to customize the settings, select “Custom.”
- Once you have selected your desired option, close the preferences/options page.
Firefox's Enhanced Tracking Protection will now be enabled based on your chosen setting. It will automatically block various trackers, improving your privacy and security while browsing the web.
2. Check and Manage Do Not Track settings on Firefox
To manage the Do Not Track (DNT) settings in Firefox, you can follow these steps:
- Open the Firefox browser on your computer.
- Click on the menu button (three horizontal lines) in the top-right corner of the Firefox window.
- From the drop-down menu, select “Preferences” (on macOS) or “Options” (on Windows).
- In the left sidebar of the preferences/options page, click on “Privacy & Security.”
- Scroll down to the “Enhanced Tracking Protection” section.
- Within this section, you will find the “Send websites a Do Not Track signal that you don't want to be tracked” option. It is accompanied by a drop-down menu.
- Click on the drop-down menu and choose one of the following options:- Always: This option sends the Do Not Track signal to every website you visit, indicating your preference not to be tracked.- Only when using Tracking Protection: This option sends the Do Not Track signal only when Firefox's Tracking Protection is active, which occurs when Enhanced Tracking Protection is set to “Standard” or “Strict.”- Never: This option disables the Do Not Track signal altogether, indicating that you are okay with being tracked.
- Once you have made your selection, close the preferences/options page.
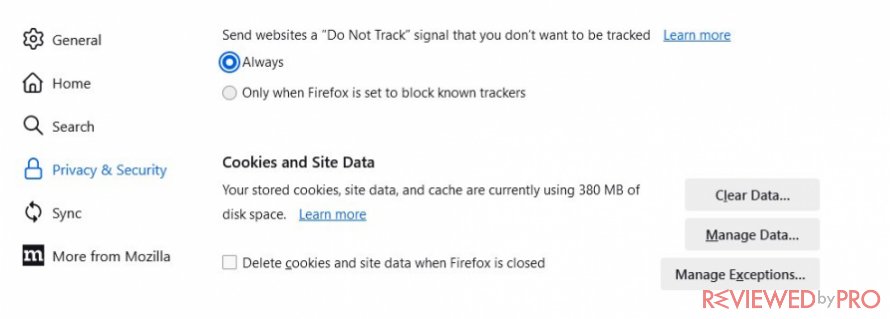
Firefox will now use the Do Not Track setting you have chosen while browsing websites. It's important to note that the effectiveness of the Do Not Track signal is ultimately determined by each website's compliance with it. Some websites may still track your activity regardless of the Do Not Track preference.
3. Enable private browsing mode
- Open the Firefox browser on your computer.
- Click on the menu button (three horizontal lines) in the top-right corner of the Firefox window.
- From the drop-down menu, select “New Private Window.”
- Alternatively, you can use the keyboard shortcut by pressing:- Windows/Linux: Ctrl + Shift + P
– macOS: Command + Shift + P - A new private browsing window will open with a purple mask icon in the top-right corner, indicating that you are in private browsing mode.
- You can now use the private browsing window to browse the web. Any websites you visit, search history, and cookies will not be saved after you close the private window.
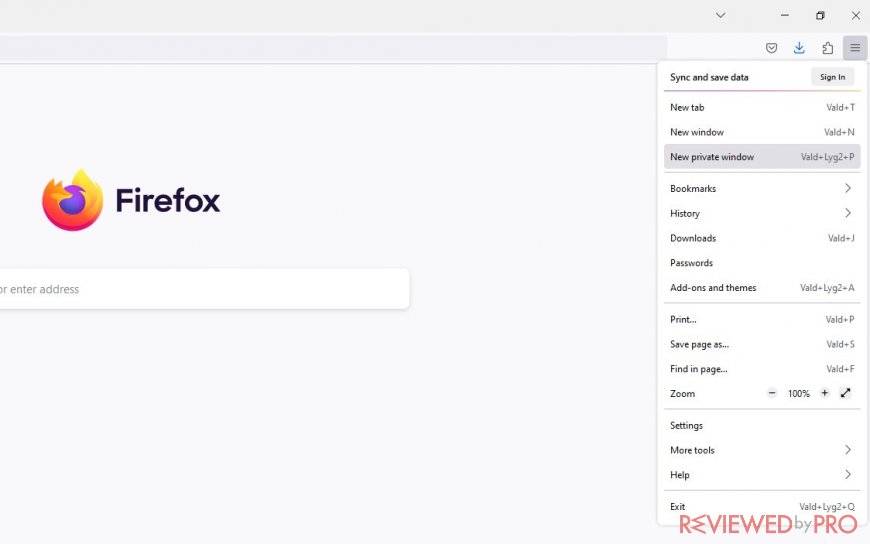
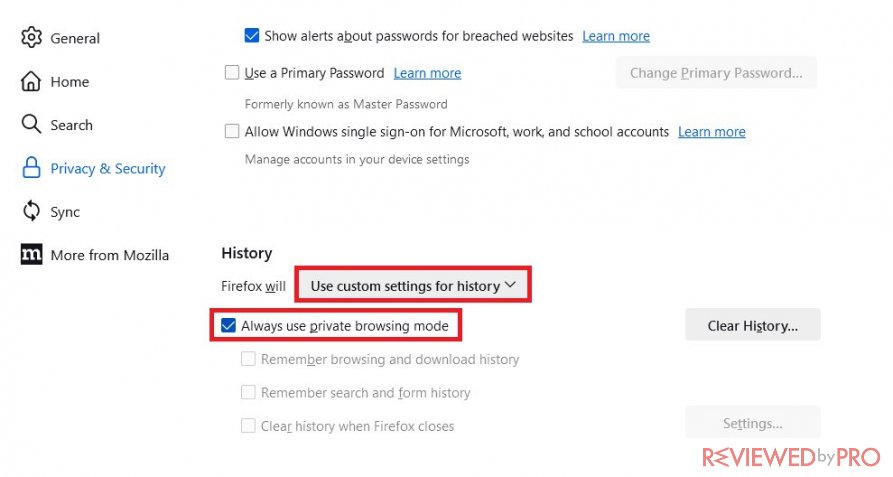
Private browsing mode in Firefox allows you to browse the web without leaving traces of your activity on the computer. It helps protect your privacy by not retaining information like visited websites, form data, or download history. Remember that private browsing mode does not make you completely anonymous online, as your internet service provider, employer, or certain websites may still track your activity. Also you can check the option “Always use a private mode” for the future sessions
4. Install a VPN extension on Firefox
- Open the Firefox browser on your computer.
- Click on the menu button (three horizontal lines) in the top-right corner of the Firefox window.

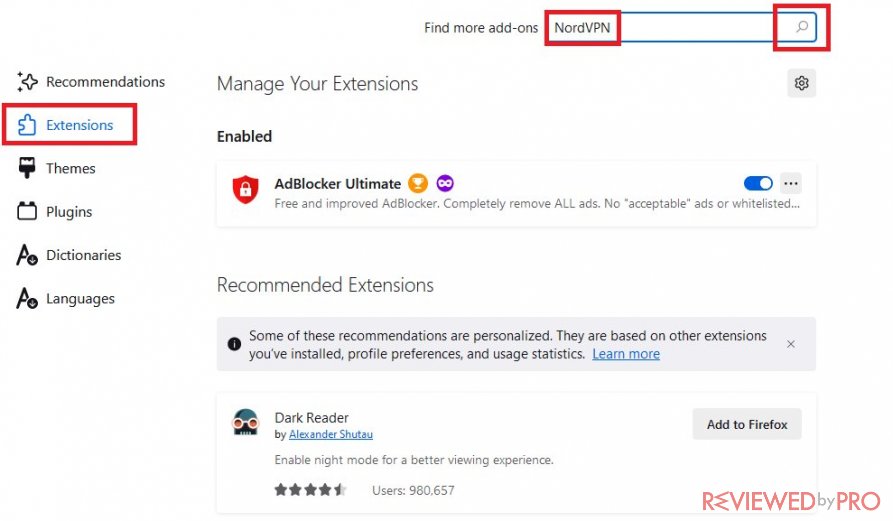
- From the drop-down menu, select “Add-ons” to open the Firefox Add-ons Manager.
- In the Add-ons Manager, click on the “Extensions” tab on the left sidebar.
- In the search bar on the right side of the Add-ons Manager, type the name of the VPN extension you want to install (e.g., “NordVPN,” etc.).

- Press Enter or click on the magnifying glass icon to initiate the search.
- A list of available VPN extensions will be displayed. Review the options and click on the desired VPN extension you want to install.
- On the extension's page, click on the “Add to Firefox” or “Install” button.
- Firefox will begin downloading and installing the VPN extension. Once the installation is complete, a confirmation message will appear.
- You may need to grant certain permissions or follow additional setup instructions provided by the VPN extension. Follow the prompts and provide any necessary information to complete the installation.
- After the installation, you should see the VPN extension icon added to the toolbar or menu bar of your Firefox browser.
- Click on the VPN extension icon to open its interface and connect to a VPN server of your choice. Follow the instructions provided by the specific VPN extension for connecting and configuring your VPN settings.
By installing a VPN extension on Firefox, you can enhance your online privacy and security by encrypting your internet connection and routing your traffic through a secure server. Note that you may need an active subscription to a VPN service in order to use the VPN extension effectively.

Official website
www.nordvpn.com
Our Rating
 (Excellent – 4.9/5)
Available applications

Money-back guarantee
30-days
Price from
$3.49/month (-70% deal)
Visit website

More information
NordVPN review
5. Check security features
- Open the Firefox browser on your computer.
- Click on the menu button (three horizontal lines) in the top-right corner of the Firefox window.
- From the drop-down menu, select “Preferences” (on macOS) or “Options” (on Windows).
- In the left sidebar of the preferences/options page, click on “Privacy & Security.”
- Under the “Enhanced Tracking Protection” section, you can review and adjust the settings related to blocking trackers, cookies, and harmful content.
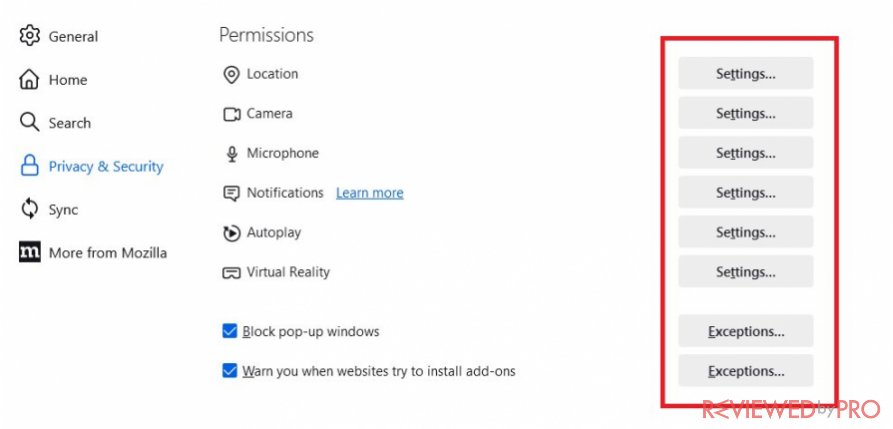
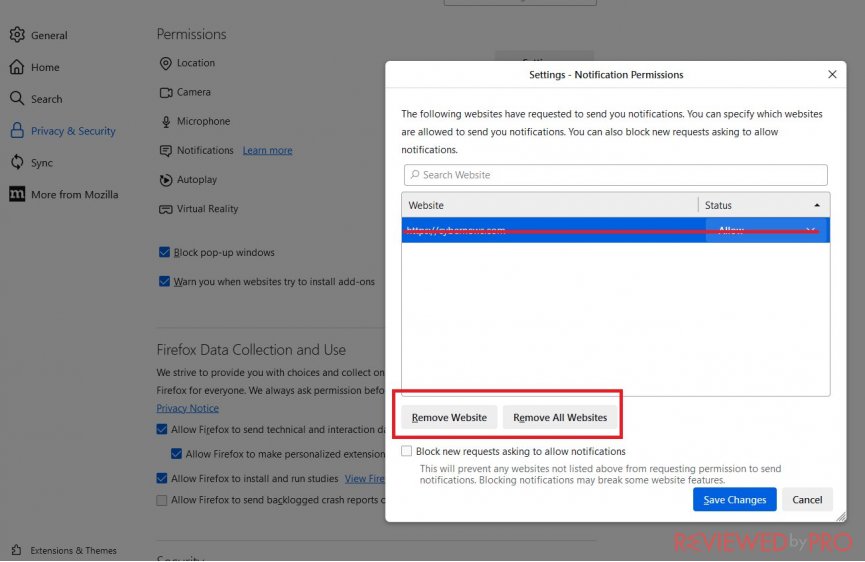
- Scroll down to the “Permissions” section to manage permissions for camera, microphone, location, and notifications. Ensure that you have granted permissions only to trusted websites.
- Under the “Firefox Data Collection and Use” section, you can control the data sharing preferences with Mozilla. Adjust the settings according to your privacy preferences.
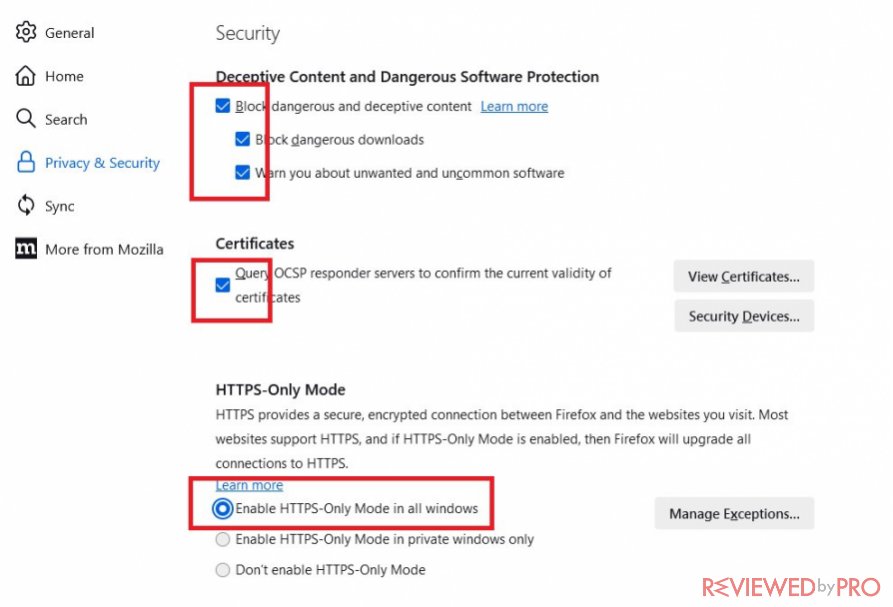
- In the “Certificates” section, you can manage your certificates and view details about trusted certificate authorities.
- Click on the “Security” tab to access advanced security settings.
- In the “Security” section, you can customize settings related to passwords, forms, and downloading files. Ensure that the appropriate security measures are enabled.
- Scroll down to the “Certificates” section to manage your certificates and encryption settings.
- At the bottom of the page, you can click on the “View Certificates” button to access and manage certificates stored in Firefox.
6. Enable DNS over HTTPS
- Open the Firefox browser on your computer.
- Click on the menu button (three horizontal lines) in the top-right corner of the Firefox window.
- From the drop-down menu, select “Preferences” (on macOS) or “Options” (on Windows).
- In the left sidebar of the preferences/options page, click on “General.”
- Scroll down to the “Network Settings” section.
- Click on the “Settings…” button next to the “Configure how Firefox connects to the internet” option.
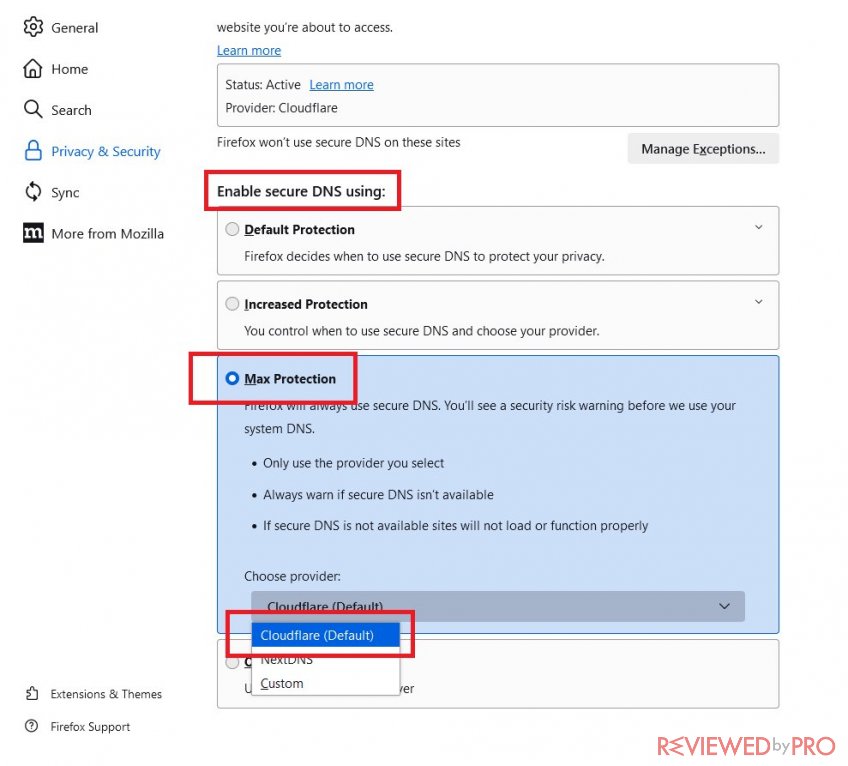
- In the Connection Settings window that appears, check the box next to “Enable DNS over HTTPS.”
- From the drop-down menu next to it, you can choose the DNS provider that you want to use for DNS over HTTPS. By default, Firefox uses Cloudflare, but you can select other providers like NextDNS or Custom if you have specific preferences.
- Once you have selected the DNS provider, click the “OK” button to save the settings.
7. Turn on pop-up and ad blockers
- Open the Firefox browser on your computer.
- Click on the menu button (three horizontal lines) in the top-right corner of the Firefox window.
- From the drop-down menu, select “Preferences” (on macOS) or “Options” (on Windows).
- In the left sidebar of the preferences/options page, click on “Privacy & Security.”
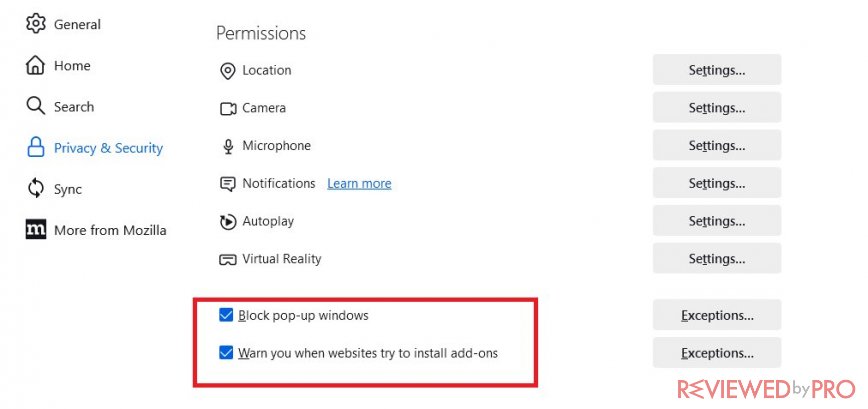
- Scroll down to the “Permissions” section.
- Under the “Permissions” section, you will find the following options related to blocking pop-ups and ads:- Block pop-up windows: Check this box to enable the built-in pop-up blocker in Firefox. It will prevent websites from opening pop-up windows without your permission.- Block new requests asking to allow notifications: Check this box to block websites from displaying notifications prompts.- Send websites a “Do Not Track” signal: Enable this option if you want Firefox to send a signal to websites requesting not to track your browsing activity.
- Additionally, you can click on the “Settings…” button next to the “Block pop-up windows” option to configure exceptions or advanced settings for the pop-up blocker.
- To enhance ad blocking, you can install ad-blocking extensions from the Firefox Add-ons store. Some popular ad-blocking extensions include uBlock Origin, Adblock Plus, and Privacy Badger. Open the Add-ons Manager by clicking on the menu button, selecting “Add-ons,” and searching for the desired ad-blocking extension.
- Once you find the ad-blocking extension you want to install, click on the “Add to Firefox” or “Install” button next to it.
- After the installation, follow the prompts to configure any additional settings specific to the ad-blocking extension.
8. Disable automatic search suggestions
- Open the Firefox browser on your computer.
- Click on the menu button (three horizontal lines) in the top-right corner of the Firefox window.
- From the drop-down menu, select “Preferences” (on macOS) or “Options” (on Windows).
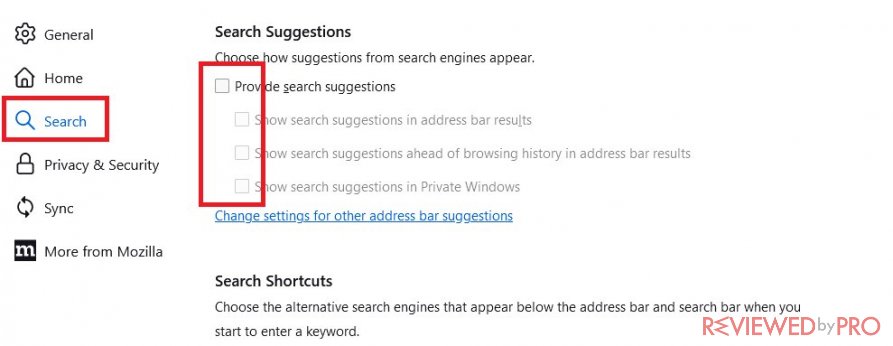
- In the left sidebar of the preferences/options page, click on “Search.”
- In the “Default Search Engine” section, you will see the search engine that Firefox uses for its search suggestions.
- To disable search suggestions, uncheck the box next to “Provide search suggestions” or a similar option depending on the version of Firefox you are using.
- You can also click on the “Search Suggestions Settings” button to further customize the behavior of search suggestions, such as enabling or disabling specific search engines.
- Once you have made your desired changes, close the preferences/options page.

9. Control what’s being synchronized
- Open the Firefox browser on your computer.
- Click on the menu button (three horizontal lines) in the top-right corner of the Firefox window.
- From the drop-down menu, select “Preferences” (on macOS) or “Options” (on Windows).
- In the left sidebar of the preferences/options page, click on “Firefox Account” or “Sync” (depending on your Firefox version).
- If you're not already signed in to your Firefox Account, sign in using your account credentials.
- Once signed in, you will see the synchronization options available.
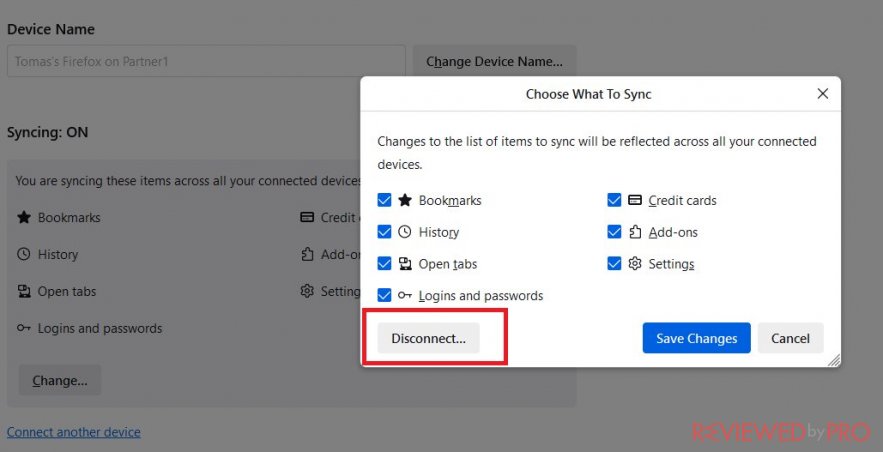
- To control what's being synchronized, click on the “Sync Settings” or “Manage What's Being Synced” button.
- In the synchronization settings, you will find a list of different categories, such as bookmarks, browsing history, open tabs, add-ons, passwords, and more.
- For each category, you can toggle the switch to enable or disable synchronization. If the switch is blue, it means the category is being synchronized, and if it's gray, it means it's not being synchronized.
- Review the categories and adjust the switches according to your preferences. You can choose to synchronize specific categories or disable synchronization for all categories.
- Once you have made your desired changes, close the preferences/options page.
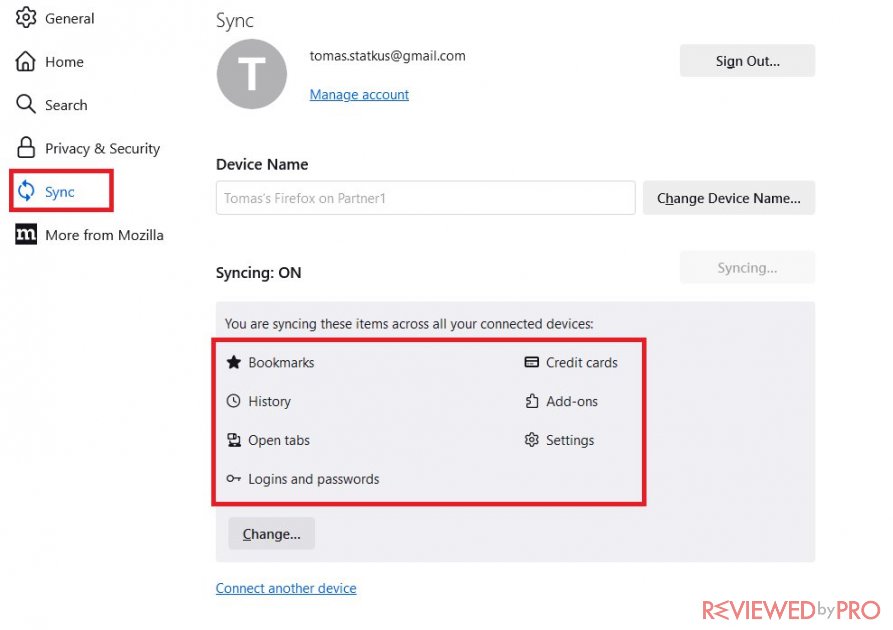

By controlling what's being synchronized on Firefox, you can customize the data that is shared and synchronized across your devices using your Firefox Account. This allows you to have more control over your data privacy and storage preferences.

10. Review website permissions
- Open the Firefox browser on your computer.
- Visit the website for which you want to review permissions.
- Click on the padlock icon located in the address bar. If the website is using an insecure connection, you may see an information icon instead.
- A drop-down menu will appear. Click on the arrow icon or the “Connection Secure” label.
- In the drop-down menu, you will see various options related to the website's permissions. These options may include:- Permissions: This option allows you to view and manage specific permissions granted to the website, such as camera, microphone, location, and notifications.- Disable Blocking for This Site: This option allows you to disable any content blocking settings specifically for the current website.- View Cookies: This option lets you view the cookies stored by the website on your browser.- Clear Cookies and Site Data: This option allows you to remove all cookies and site data associated with the website.- View Pocket Saves: This option is specific to the Pocket service, where you can view and manage any saved articles or content from the website.
- Click on the relevant option to review or manage the specific permissions or settings for the website.


11. Turn on add-on installation warnings
- Open the Firefox browser on your computer.
- Click on the menu button (three horizontal lines) in the top-right corner of the Firefox window.
- From the drop-down menu, select “Add-ons” to open the Firefox Add-ons Manager.
- In the Add-ons Manager, click on the “Extensions” tab on the left sidebar.
- Click on the gear icon (settings) located in the top-right corner of the Add-ons Manager.
- From the drop-down menu, select “Install Add-ons from File…”
- In the Install Add-ons from File prompt, check the box next to “Warn me when sites try to install add-ons.”
- Close the Add-ons Manager.


12. Disable Firefox telemetry
- Open the Firefox browser on your computer.
- Type “about:config” in the address bar and press Enter.

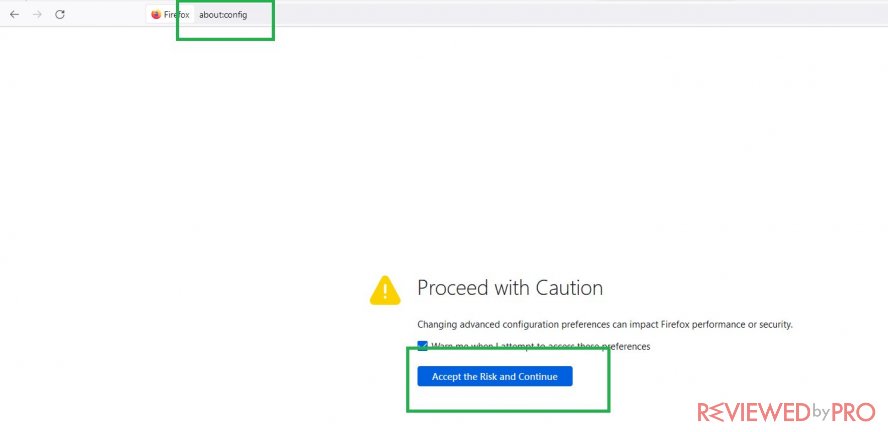
- A warning message will appear stating, “This might void your warranty!” Click on the “I accept the risk!” button to proceed.
- You will now see the Firefox advanced configuration page.
- In the search bar at the top, type “telemetry” to filter the preferences related to telemetry.
- You should see various preferences related to telemetry. Here are some key preferences you can modify:- “toolkit.telemetry.enabled”: Double-click on this preference to set its value to “false”. This disables the main telemetry feature in Firefox.- “toolkit.telemetry.unified”: Double-click on this preference to set its value to “false”. This disables the unified telemetry feature.- “toolkit.telemetry.archive.enabled”: Double-click on this preference to set its value to “false”. This disables archiving of telemetry data.- “toolkit.telemetry.newProfilePing.enabled”: Double-click on this preference to set its value to “false”. This disables the telemetry ping for new profiles.- “datareporting.healthreport.uploadEnabled”: Double-click on this preference to set its value to “false”. This disables the uploading of health report data.
- After modifying the preferences, close the about:config tab.
By disabling Firefox telemetry, you prevent Firefox from collecting and sending usage data and statistics to Mozilla. This helps to maintain your privacy and control the information shared by your browser.
13. Disable WebGL and WebRTC
- Open the Firefox browser on your computer.
- Type “about:config” in the address bar and press Enter.
- A warning message will appear stating, “This might void your warranty!” Click on the “I accept the risk!” button to proceed.
- You will now see the Firefox advanced configuration page.
- In the search bar at the top, type “webgl.disabled” to locate the preference related to WebGL.


- You should see the “webgl.disabled” preference in the list. Double-click on it to set its value to “true”. This disables WebGL in Firefox.
- In the search bar, type “media.peerconnection.enabled” to locate the preference related to WebRTC.
- You should see the “media.peerconnection.enabled” preference in the list. Double-click on it to set its value to “false”. This disables WebRTC in Firefox.
- After modifying the preferences, close the about:config tab.
By disabling WebGL and WebRTC, you can prevent websites from utilizing these technologies in your browser, which can help to enhance privacy and security. However, please note that disabling these features may impact certain web applications or functionalities that rely on them.
14. Delete cache and cookies
- Open the Firefox browser on your computer.
- Click on the menu button (three horizontal lines) in the top-right corner of the Firefox window.
- From the drop-down menu, select “Preferences” (on macOS) or “Options” (on Windows).
- In the left sidebar of the preferences/options page, click on “Privacy & Security.”
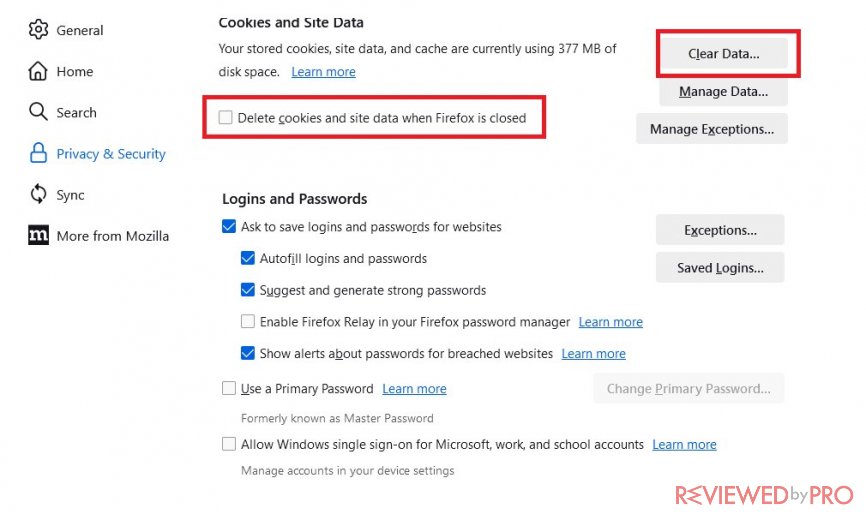
- Scroll down to the “Cookies and Site Data” section.
- Click on the “Clear Data…” button.
- In the Clear Data window that appears, make sure the checkboxes for “Cookies and Site Data” and “Cached Web Content” are selected.
- You can also choose to select other checkboxes, such as “Offline Website Data” or “Site Preferences,” if you want to remove additional data.
- Click on the “Clear” button to delete the selected data.
- Firefox will start deleting the cache and cookies. Once the process is complete, you can click on the “Done” button to close the Clear Data window.

15. Change the default search engine
To change the default search engine in Firefox, you can follow these steps:
- Open Firefox on your computer.
- Click on the three horizontal lines (hamburger menu) located in the top-right corner of the browser window.
- From the drop-down menu, select “Preferences” (on macOS) or “Options” (on Windows/Linux).
- In the Preferences/Options tab, click on “Search” in the left-hand sidebar.
- Under the “Default Search Engine” section, you'll see a dropdown menu. Click on it to reveal the available search engine options.
- Select the search engine you want to set as the default. If the search engine you prefer is not listed, click on “Find more search engines” at the bottom of the dropdown menu to browse additional options.
- Once you've selected your desired search engine, close the Preferences/Options tab.
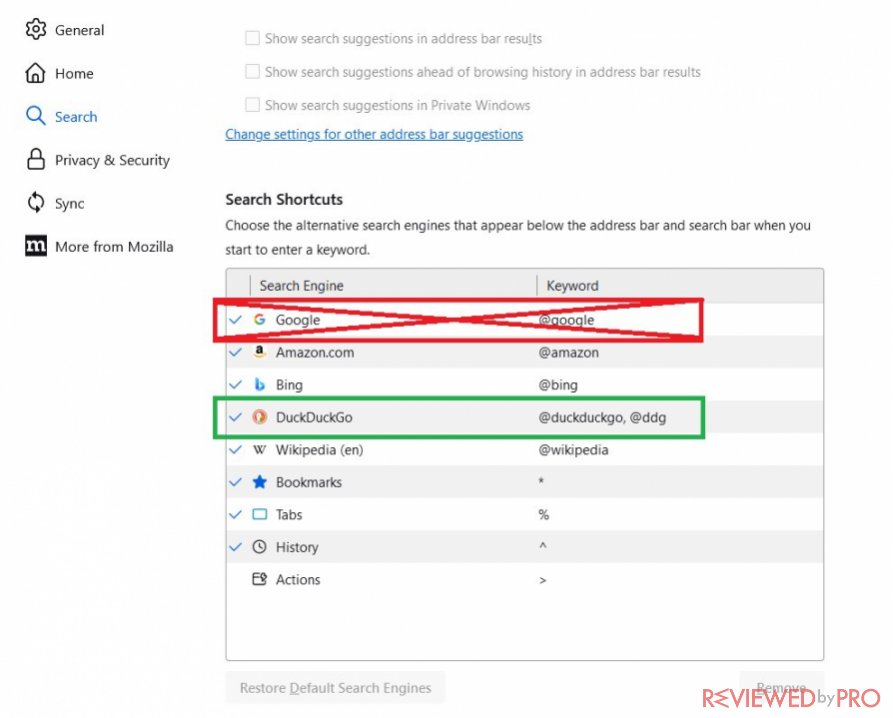

From now on, when you perform searches using the address bar or the search bar in Firefox, the browser will use your newly selected default search engine.
